Updated: November 25, 2025
There are so many different ways to cook steak, each with its pros and cons, so how do you know which approach is best for your palate and the protein at hand?
In this guide to steak cooking methods, we’ll describe the five most popular steak cooking options and share some expert-level tips that’ll have you producing juicy, tender cuts of steak time and time again.
Ready, set, sear!
Table of Contents
What Are the Different Ways to Cook Steak?
How do Steak Cooking Methods Affect Flavor?
Tips for Cooking the Perfect Steak
Cook Your Steak Like a Pro with Allen Brothers Beef
What Are the Different Ways to Cook Steak?
A perfectly cooked steak requires a bit of skill, precision, and some creativity. Every method creates unique textures, bold flavors, and unforgettable results. With proper techniques, any steak transforms into an exceptional meal. Here are five different ways to cook steak, plus a tip that could have you combining modern and tried-and-true cooking methods for the very first time.
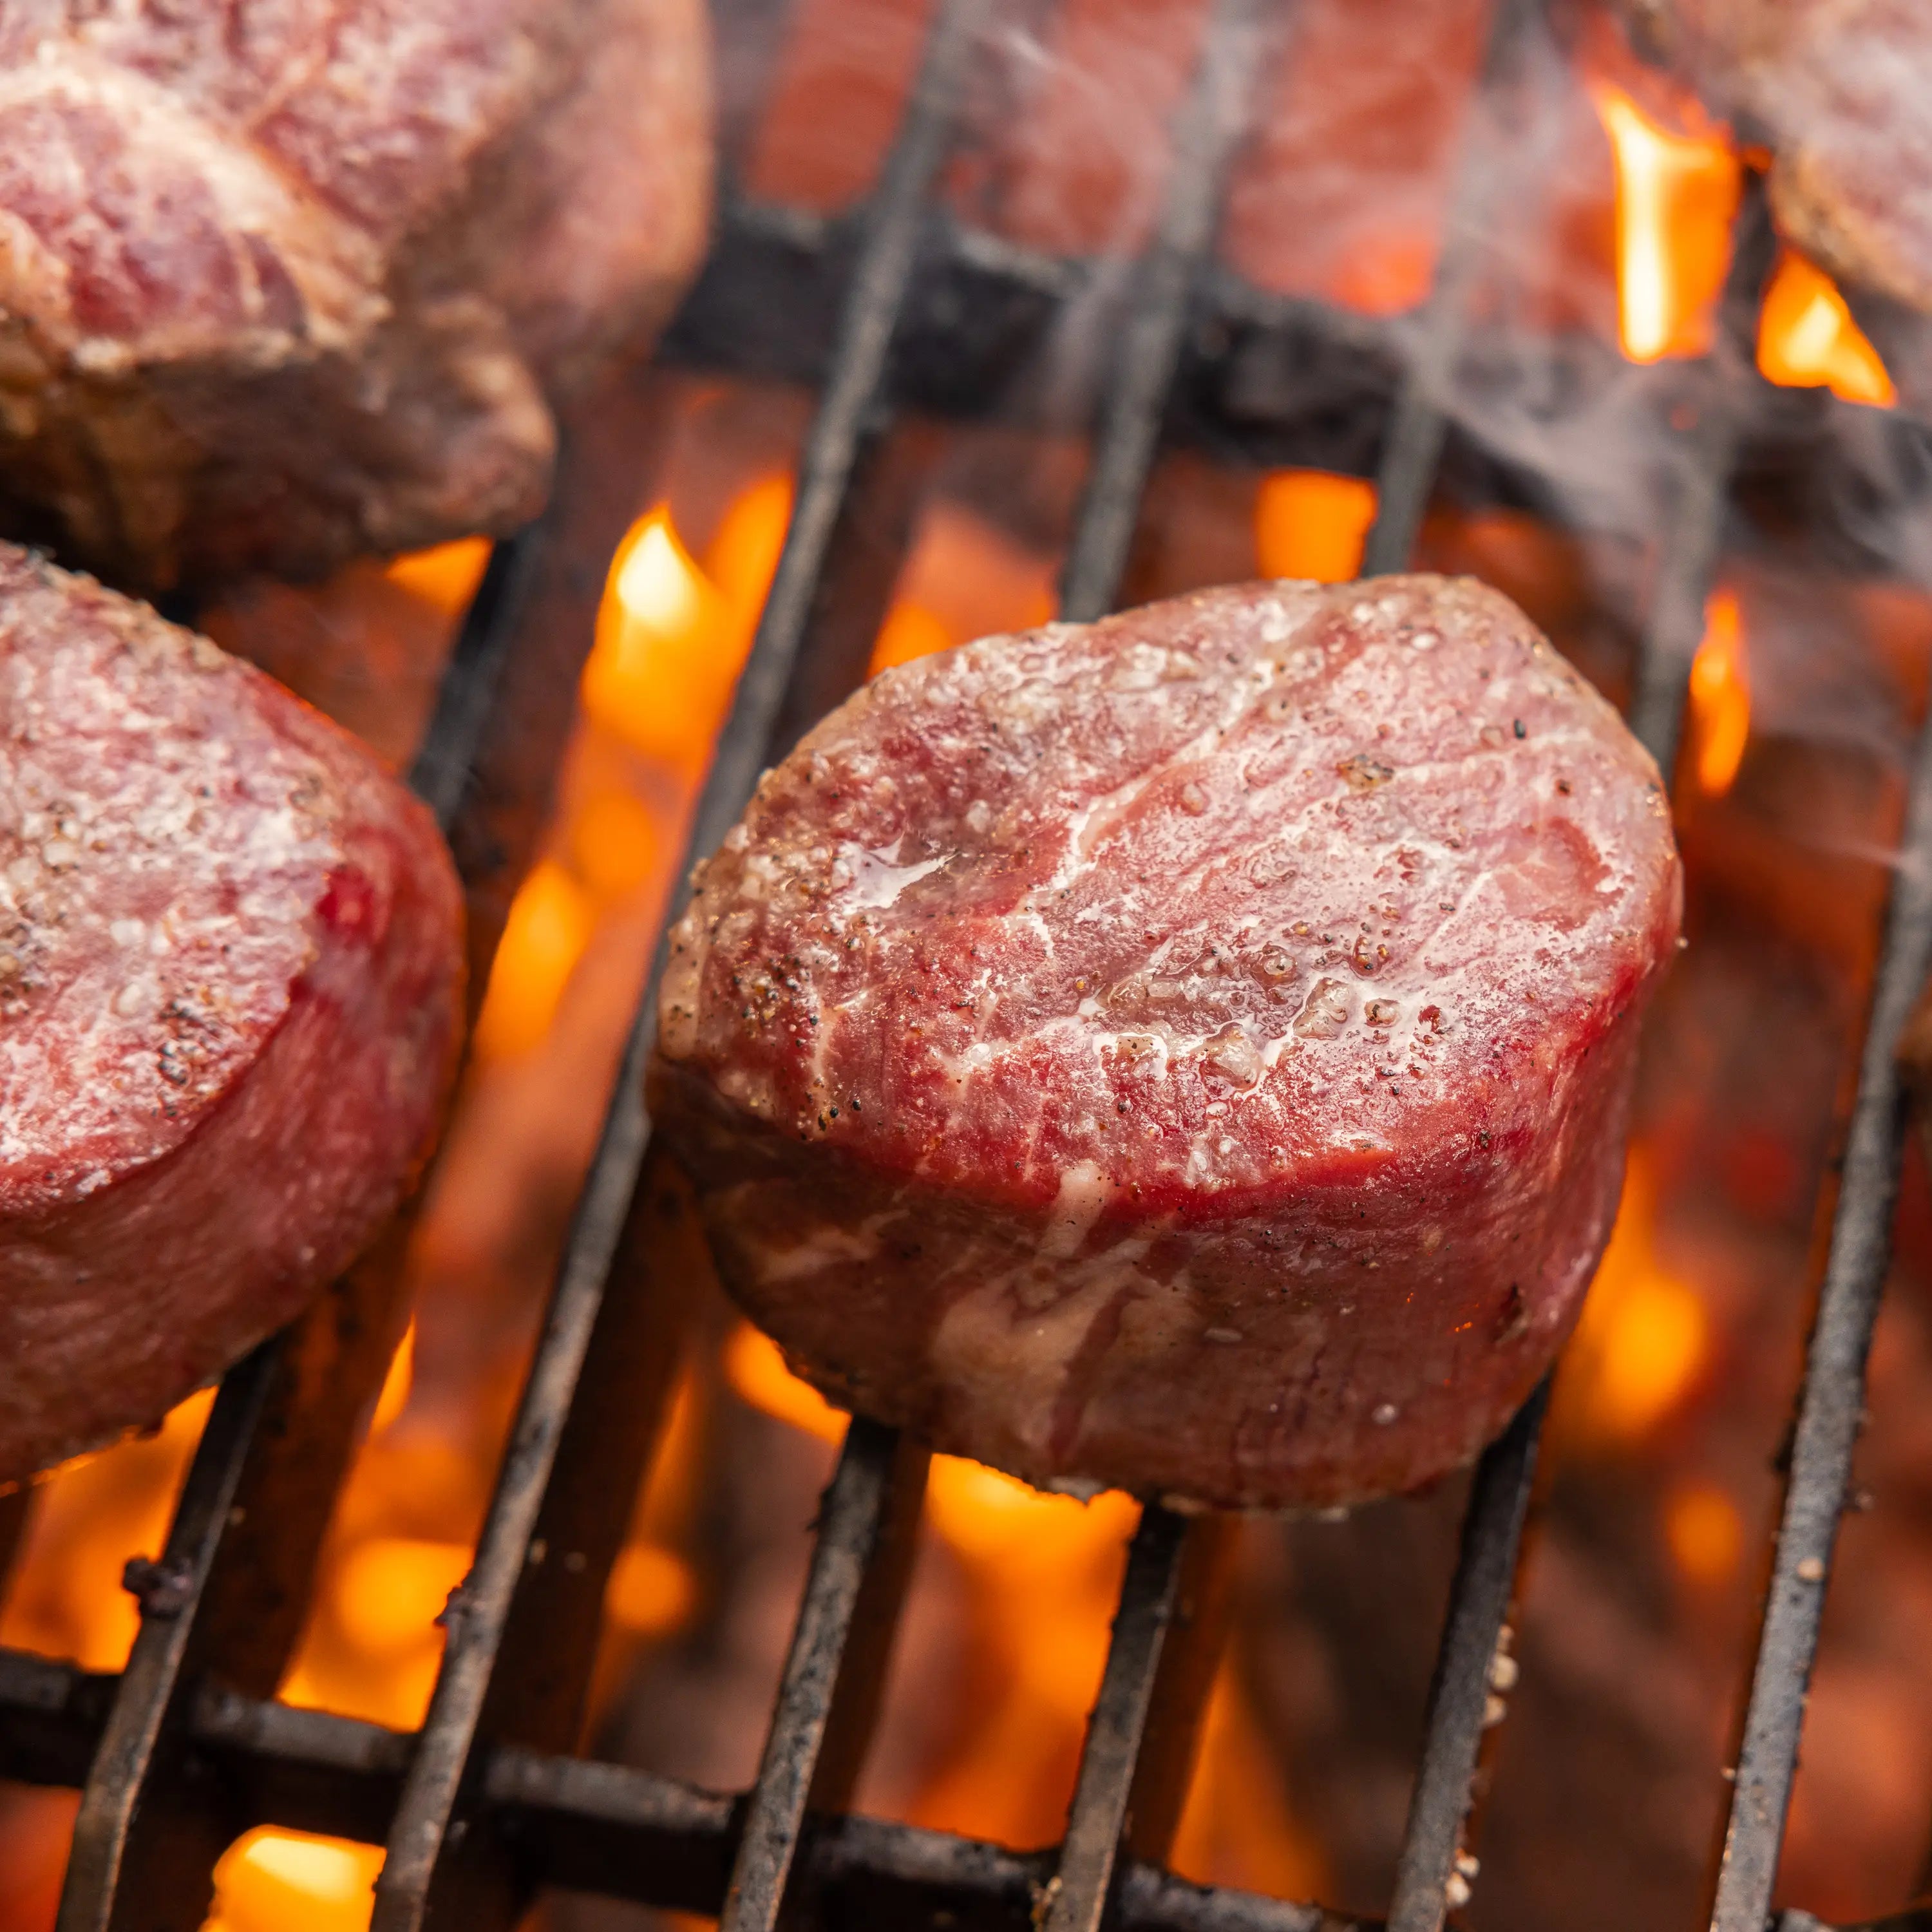
Grilling
Grilling is one of the most popular ways to prepare steak. It’s relatively easy, it’s convenient, and you can cook multiple dishes on the BBQ at the same time to satisfy a crowd.
How to Grill a Steak
A beautifully grilled steak depends on harnessing the power of direct heat, so you’ll start by ensuring your grill is nice and hot.
Season the Steak
Then, season your steak on both sides, using your preferred seasoning. There are many types of specialty seasonings available, but remember that sometimes simple seasonings like kosher salt and black pepper are all you need for a delicious steak dinner. For leaner cuts, add olive oil before grilling, but skip this step if you’re using a wet marinade that already contains oil. Now you’re ready to place the steaks on the hot grill.
Let the Steak Sear
The next step, which is possibly the hardest for those just learning how to grill steak, is to leave the steak alone. Avoid touching or moving the steaks for 3 to 5 minutes — half of the total grill time depending on how you like your steak prepared. It’s important to give the meat a chance to develop a good sear, as that golden-brown deliciousness is both beautiful to look at and a significant source of flavor.
Flip and Finish Cooking
After you’ve cooked both sides of your steak, remove it from the heat to avoid overcooking and let it rest so the juices can redistribute before it’s time to cut and serve. A larger cut of meat like a ribeye or porterhouse will need to rest longer than a smaller filet or thinner flank steak.
Rest the Steak
The result should be a juicy steak with incredible texture and just a tinge of smoke from the grill itself. Perfection.
Pro Tips for Grilling Steak
For added smoky flavor, use a charcoal grill and allow the steak to rest on a wooden cutting board for an extra layer of aroma.
Pan-Searing
Grilling may be king, but pan-seared steaks offer unmatched convenience for indoor cooking. This method creates a delicious crust and caramelized exterior while locking in the steak’s natural juices. A hot skillet or cast-iron pan is the best tool for this approach.
How to Pan-Sear a Steak
Preheat the Pan
Start by preheating the pan on your stovetop until it's very hot.
Add the Steak
Next, add your seasoned steak. You can either oil up your steak as you season it, use a wet marinade with oil already in it, or drop a chunk of butter in the pan right as you add the steak (don’t put the butter in any sooner — you need the fat from the steak to keep the butter from burning).
Finish in the Oven (Optional)
For thicker cuts, you may want to pan-fry your steak until perfectly seared, then finish the steak in the oven to achieve a consistent level of doneness throughout the meat.
Pro Tips for Pan-Searing Steak
Create a restaurant-quality steak by basting your pan-fried filet mignon or a similarly top-tier cut in flavored butter. Just pan-sear your steak as normal, then, as the meat is finishing its cooking on the second side, add a few tablespoons of butter, a few smashed garlic cloves, and several sprigs of fresh rosemary or thyme to the hot pan. Spoon the herb-infused butter over the steak, tilting the pan as needed to capture the tasty fat.
Reverse-Searing
Reverse-searing has become a favorite technique for creating perfectly cooked steaks with a beautifully crisp crust. This method works exceptionally well for thick cuts like tomahawk ribeye or porterhouse, where even cooking and a caramelized exterior are key.
How to Reverse-Sear a Steak
Cook Slowly at Low Heat
Begin by slowly cooking the steak in an oven or over indirect heat on a grill. This gradual approach ensures the interior reaches just below your target doneness without overcooking.
Finish with a Sear
Once the steak is ready, it’s finished with a quick sear in a very hot pan or directly over an open flame. The result is a steak with consistent doneness throughout and a crust packed with flavor.
Pro Tips for Reverse-Searing
Reverse-searing shines when preparing marbled cuts like ribeye steaks and wagyu varieties. The slower cooking time allows the fat to melt into the meat, enhancing tenderness and boosting the steak’s rich, beefy flavor.
For an extra layer of flavor, season the steak lightly before slow cooking and add a finishing sprinkle of coarse salt or a brush of garlic butter just before the final sear. This enhances the crust and elevates the steak's overall taste.
Sous Vide
Sous vide is a modernist steak cooking technique that sees your preferred cut of beef vacuum-sealed into a special heat-safe pouch before it’s submerged in a water bath and cooked at a very precise temperature. Chefs love sous vide because it’s easy to control — you can dial in the temperature to the exact degree, and the sous vide machine will ensure it stays steady for the duration of the cooking time.
How to Cook Steak Sous Vide
Vacuum-seal your chosen cut of beef in a heat-safe pouch. Then submerge the pouch in a water bath set to your desired temperature. The sous vide machine will hold that temperature steady for the full cooking time, ensuring precision.
Once cooked, the steak can be served as-is, but many cooks finish it with a quick sear in a hot pan or on the grill to add flavor and texture.
Best Uses for Sous Vide
The downsides of sous vide are that it requires specialized machinery and you’ll have to learn the ins and outs before you can execute a sous vide steak perfectly. Some people also take issue with the ultra-tender texture of sous vide steak; you can often cut sous vide filets with a fork, and the lack of direct heat means the marbling in a flat iron, NY strip, and other types of steaks won’t have a chance to crisp up as it would in a pan or on a grill.
However, the upside is that once you master the art of sous vide cooking, you can cook up a beautifully consistent steak that’s exactly how you like it every time. You can also use the vacuum-seal step to incorporate additional flavoring agents, like garlic or herbs, and they’ll penetrate the meat far better than a traditional “open-air” marinade.
Pro Tips for Sous Vide
Do you love the great steaks sous vide creates but find yourself missing the crispy edges you get from direct heat? You can reverse sear your steak by preparing it sous vide, then finishing it in a hot pan or cast-iron skillet. It takes some experimentation to get the balance just right, but in doing so, you achieve the incredible tenderness that sous vide provides while also getting the crispiness that many love from a seared steak.
Broiled
Broiling requires a radiant (enclosed) heating source that cooks steaks from above. It’s similar to grilling, except the heat source is above the steak instead of below it and your steak won’t come into contact with actual flame. That’s a positive for steak purists who’d rather amp up the innate beefy flavor of a strip steak, T-bone, or top sirloin than add the earthy smokiness offered by charcoal or gas-powered grill.
Why Steakhouses Love Broiling
Steakhouses love broiling because it’s easy to cook several steaks at the same time and this style of cooking steak is relatively smoke-free. That’s because juices stay with the steak and on the cooking surface or drip pan rather than dropping between the slats of your grill and into the fire where they can cause flares.
How to Broil a Steak at Home
Broiling at home requires a convection oven or countertop cooker with a broiler feature. Some ovens even have a dedicated broiler drawer, which isn’t just good for cooking steaks but also for browning casseroles, making garlic bread, or caramelizing halved peaches for dessert. To broil a steak, place your oven rack so the meat will sit 3–6 inches below the heat source, preheat the broiler, and position the steak on a broiler pan or baking sheet to catch juices. Cook one side until it develops a browned crust, then flip and broil the other side, checking often since broiler heat can vary dramatically between appliances.
Challenges of Broiling
Keep in mind that broiler heat is difficult to control, making this steak cooking technique a bit imprecise. You’ll need to check your steak often and remember that the actual heat that comes with a broiler setting will differ (sometimes wildly) from appliance to appliance.
How do Steak Cooking Methods Affect Flavor?
The best cooking method for steak depends on the flavors and textures you love most. Each technique brings out different qualities in the meat, from smoky charred edges to melt-in-your-mouth tenderness. Consider guest preferences as well as side dishes to help determine which steak cooking method you choose.
Here’s how each method brings out a unique flavor:
- Grilling: Grilling adds a smoky, charred flavor perfect for bold cuts like ribeye or porterhouse. High temperatures caramelize the surface, locking juices inside and adding a crisp texture. Grilled steaks deliver rich flavors ideal for outdoor meals or classic steak dinners.
- Pan-Searing: Pan-searing creates a golden crust with nutty flavors and caramelized edges. A hot skillet transforms the surface, adding depth to cuts like filet mignon or New York strip. Butter basting with garlic or herbs adds layers of flavor during cooking.
- Reverse-Searing: Reverse-searing balances even cooking with a crispy crust. Slow cooking allows flavors to develop fully before finishing with high heat. Thick cuts like tomahawk ribeye or porterhouse achieve ideal textures and bold taste using this method.
- Sous Vide: Sous vide ensures precise doneness and tender results. Slow, controlled cooking locks natural flavors inside the steak while infusing it with herbs or garlic. A quick, final sear adds crisp edges to complete the dish.
- Broiling: Broiling draws out the meat’s natural flavors while avoiding smokiness. Radiant heat caramelizes the surface while preserving a juicy interior, creating simple, satisfying results for leaner cuts or pure steak flavor.
Tips for Cooking the Perfect Steak
You can read up on the best ways to prepare steak for decades and still not achieve perfection until you buy a piece of high-quality meat, put it on the heat, and see what happens. In other words, practicing various steak cooking methods will lead to increasing levels of deliciousness. These tips should help you hit your culinary targets, no matter what cut you choose to cook and serve:
1. Choose the right cut for your recipe
You can cook any steak any way you choose, but the truth is, some steak cooking styles are better suited to certain cuts. Both bone-in ribeye and boneless ribeye are perfect steaks to grill. All that marbled fat reacts beautifully to the direct heat, with some of it melting into the steak and the fat around the edges of the meat crisping and curling up into mouthwateringly tasty bites. Flank steak loves a good marinade followed by a trip to the grill or the broiler. Meanwhile, a New York strip takes well to pan-frying where it can bask in added fat.
2. Let the steak get to room temperature before cooking
Allowing steak to reach room temperature before cooking improves both texture and flavor. Cold steak taken directly from the fridge requires significantly longer cooking time, which can lead to uneven results. The outer layers may overcook while the center remains underdone, resulting in a dry or stringy texture. The United States Food and Drug Administration (FDA) advises keeping refrigerators at 40°F or below to prevent food-borne illnesses and spoilage. While this keeps your steak safe for storage, cooking it straight from this temperature presents challenges.
For the best outcome, remove the steak from the refrigerator about 30 minutes before cooking. This simple process prepares you for the following steps and ultimately allows the meat to cook more evenly, ensuring the interior reaches your desired doneness without overcooking the exterior.
However, not everyone can leave their steaks out for 20 or 30 minutes before cooking them. If you know you’ll be rushing home from work just in time for dinner, salt the surface of your steaks and rest them in the fridge, uncovered, overnight. The salt will wick away some surface moisture so you have a clearer path to that GBD (golden-brown deliciousness). When you’re ready to cook, blot the steak as you would normally, then apply any additional seasoning you like (easy on the salt now) and proceed to the grill or stove.
3. Pat the steak dry
Now that your steak has reached room temperature, it’s time to pat the steak dry. Removing moisture from the steak's surface creates the ideal conditions for a proper sear. Excess moisture turns into steam during cooking, which prevents the steak from forming a golden-brown crust. It also makes it difficult to properly season your steak evenly, as the seasoning will clump and instantly stick to a wet steak.
All it takes to prepare a moist steak is a couple of paper towels and about 60 seconds of gentle blotting (don’t forget to mop up any wayward juices off the platter so you’re not putting your now-dry steak back onto a little puddle).
4. Season Your Steak Generously
Proper seasoning brings out the natural flavors of the steak and adds depth to every bite. While this step involves a lot of personal preference, there are some tried and true, simple seasonings that you can start with. Salt enhances the meat’s juiciness and richness, while freshly cracked pepper adds a subtle heat. For additional flavor, include aromatics like garlic powder, smoked paprika, or dried herbs. A generous, even coating of seasoning ensures the steak has a consistent taste from edge to edge.
Applying seasoning at the right time makes a big difference. For a quick approach, season just before cooking, ensuring the salt and spices adhere to the steak’s dry surface. For extra flavor, season the steak several hours or even a day in advance. The salt will penetrate the meat, amplifying the taste and improving the texture for a truly unforgettable steak experience.
5. Get to know your grill or stove’s hot spots and adjust accordingly
All appliances, grills included, have hot spots. The potential for hot spots multiplies the more devices and accessories you incorporate into your cooking technique. When you’re pan-searing a steak, you need to be aware of which of your stove’s burners run hottest (not all medium-highs are created the same) as well as whether the pan itself might be warped, worn, or otherwise susceptible to uneven heating. Not knowing where the hot spots are on all your devices can easily be the difference between cooking a good steak and a poor one.
Once you learn those hotspots, you can adjust your cooking technique as needed. Move a thicker steak to the hot spot so it cooks at the same rate as a thinner steak, or start your steak on the hot spot before moving it to the side when you need to leave it unattended for a moment or two.
6. Use a meat thermometer to monitor internal temperature
Most people are familiar with the old thumb pad trick for gauging doneness, but that trick is just a guess and far from reliable. And, since everyone’s thumb pad feels a bit different, that “trick” can easily lead to overcooking your steak, making it dry and chewy, or undercooking it, leaving it raw and unsafe to eat.
The only foolproof way to monitor the internal temperature of your meat is to use a meat thermometer. A simple stick-and-read instant thermometer is user-friendly and affordable, but you need to check accuracy and calibration every once in a while. Digital-read thermometers offer superior accuracy, and you can even get one with a lead that allows you to keep the probe in the meat as it cooks. The digital display will maintain a constant read, situated well away from the heat source. This option is perfect for those who prefer precise temperatures, such as the ideal medium-rare steak.
Here are the ideal internal temperatures to aim for:
- Rare: 110 - 120°F
- Medium Rare: 120 - 130°F
- Medium: 130 - 140°F
- Medium Well: 140 - 150°F
- Well Done: 150°F and beyond
7. Rest your steak before serving
Think about how boiling water looks when it jumps around the inside of the pot. That’s similar to how the juices inside a steak look as it cooks. All those flavor molecules are bouncing around, even after removing the steak from the heat, and if you cut the steak before everything calms down, those juices will bounce right out of your steak and onto the cutting board, where they’ll be gone for good.
Let your steak rest (off the heat source and on a neutral surface like a serving platter or a cutting board) for about five minutes before serving. The juices will redistribute, and you’ll be on the receiving end of succulent, tender steak as a reward. Resting your steak is the secret to a juicy steak.
Pro tip: Thicker cuts need more cooking time and more rest time. A very general rule of thumb is to rest the meat for half as long as it takes you to cook it.
8. Never cut your steak with the grain
When people talk about “the grain” on a steak, they’re talking about the pattern of the meat’s muscle fibers. These fibers look a lot like stacked lines or layers. If you gently pull apart a steak, you’ll see that it either pulls apart accordion-style or resists and separates very little. When the steak pulls apart like an accordion, you are pulling apart the muscle fibers or separating the grain.
Cut your steak along the grain, or parallel to the path of those muscle fibers, and you’ll find your steak is tougher and far harder to chew. This method essentially gives you a long, uninterrupted length of the muscle, and that’s hard for human teeth to break down.
Instead, cut the piece of meat against the grain, or perpendicular to those fibers (across the accordion pleating), and you’re breaking up the muscle fibers via your knife before each bite. You’ll be amazed at how much more tender this cut makes your beef, regardless of which steak cooking method and steak recipe you choose.
Cook Your Steak Like a Pro with Allen Brothers Beef
With all these different ways to cook steak, which one is the most valid? Which one will provide you with the best steak? Ask a dozen cooks and you’ll get a dozen answers, highlighting one essential truth: the best method of cooking steak is the one you and your guests love the most. This can change daily or even with each meal. Embrace experimentation, try various steak cooking techniques, always opt for high-quality beef, and let your taste buds guide you in discovering your favorite method.
To start planning your next feast and ensure an unforgettable steak dinner, shop Allen Brothers beef today. Our premium cuts range from juicy tenderloins and incredibly flavorful Wagyu short ribs to hearty Tomahawk ribeyes, and more. Can’t decide? Grab a Steak Lovers Assortment to try USDA Prime strips, ribeyes, porterhouse and filets.
Each cut is guaranteed to satisfy your culinary desires and take your steak game to the next level. Shop Allen Brothers and find the perfect beef for your next gourmet creation!


